
TL;DR: This guide explains how to resize Hyper-V VHDX files to expand or shrink virtual disks safely. It covers Hyper-V Manager, PowerShell commands, storage optimization techniques, and best practices for IT admins managing VM capacity and performance.
Why Use Hyper-V VHDX File format?
To begin with, let’s take a step back and look at basic features that VHDX provides and why Hyper-V administrators would choose to use the newer VHDX file format as opposed to the VHD virtual disk.
The VHDX virtual disk file format was introduced with Windows Server 2012 and provides a much more powerful virtual disk format that helps to solve some of the scalability and performance constraints that exist with the VHD file format.
What are the new configuration maximums for the VHDX file format?
- Supports 64 TB virtual hard disk size
- Improved logging mechanisms in VHDX
- Automatic disk alignment
- Dynamic resizing
- Virtual disk sharing
New disk sizes
The 64 TB virtual hard disk size certainly opens up some pretty interesting use cases. However, for most, there will be no disk that will not fall within the boundaries of this new disk size and most will not even come close to this new configuration maximum. This also will negate the need to perform pass-through storage provisioning if this was necessary for size reasons.
Improved Logging
With the improved logging features that are contained within the VHDX virtual disk metadata, the VHDX virtual disk is further protected from the corruption that could happen due to unexpected power failure or power loss. This also opens up the possibility to store custom metadata about a file. Users may want to capture notes about the specific VHDX file such as the operating system contained or patches that have been applied.
Automatic Disk Alignment
Aligning the virtual hard disk format to the disk sector size provides performance improvements. VHDX files automatically align to the physical disk structure. VHDX files also leverage larger block sizes for both the dynamic and differencing disk formats. This greatly improves the performance of dynamic-sized VHDX files, making the difference in performance negligible between fixed and dynamic. The dynamic sizing option is the option that is preferred when creating VHDX files.
Shared VHDX
There is a new option starting in Windows Server 2012 to share virtual VHDX hard disks between virtual machines.
Why would you do this?
Guest clustering is an interesting option to run a clustered Windows Server configuration on top of a physical Hyper-V cluster to allow application high availability on top of virtual machine high availability. If a virtual machine fails, you still suffer the downtime it takes to restart the virtual machine on another Hyper-V host. When running a cluster inside a Hyper-V cluster, when one virtual machine fails, the second VM in the cluster assumes the role of servicing the application. A shared VHDX allows utilizing a VHDX virtual disk as a shared cluster disk between guest cluster nodes.
Optimizing VHDX Virtual Disk Files
Optimizing VHDX Virtual Disk Files allows optimizing the space in a dynamic sized virtual hard disk file. This is accomplished with the optimize-vhd cmdlet. The Compact operation is used to optimize the files. This option reclaims unused blocks and rearranges the blocks to be more efficiently packed which reduces the overall size of the VHDX virtual hard disk file.
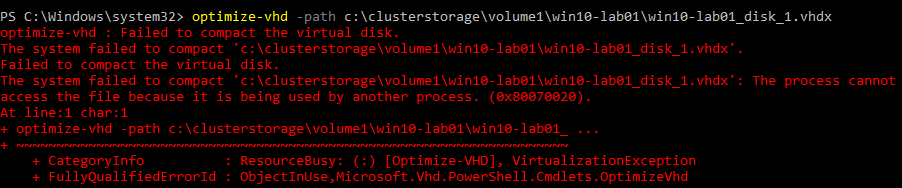
The optimize-vhd operation can only be performed with the virtual hard disk detached or attached in read-only mode if the virtual machine is running.
If the disk is not attached properly for the operation specified or in use, you will see the following:
PowerShell options available with the optimize-vhd cmdlet:
- Optimize-vhd -Path
-Mode Full – This option runs the compact operation in Full mode which scans for zero blocks and reclaims unused blocks. This is only allowed if the virtual hard disk is mounted in read-only mode. - Optimize-vhd -Path
-Mode Pretrimmed – Performs the same as Quick mode but does not require the hard disk to be mounted in read-only mode. - Optimize-vhd -Path
-Mode Quick – The virtual hard disk is mounted in read-only and reclaims unused blocks but does not scan for zero blocks. - Optimize-vhd -Path
-Mode Retrim – Sends retrims without scanning for zero blocks or reclaiming unused blocks. - Optimize-vhd -Path
-Mode Prezeroed – performs as Quick mode but does not require the virtual disk to be read-only. The unused space detection will be less effective than the read-only scan. This is useful if it has been run to zero all the free space on the virtual disk as this mode then can reclaim the space for subsequent block allocations.
Resizing Hyper-V VHDX Virtual Disk Files
Starting with Windows Server 2012 R2, you can now perform a resize operation on a virtual hard disk of a running virtual machine in Hyper-V. This was not possible with previous versions of Hyper-V as the virtual machine had to be powered off. The new functionality is called dynamic resize which allows increasing and decreasing the size of a file while virtual machines are running which has opened up a good deal of possibilities for organizations to do maintenance operations while production virtual machines are running.
What are the requirements to resize VHDX files?
- Must be VHDX, this is not available for VHD files
- Must be attached to SCSI controller
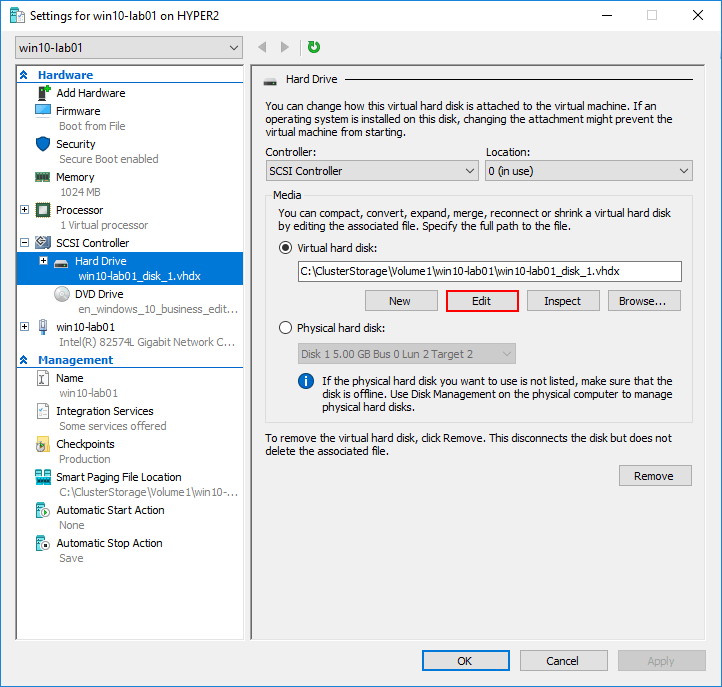
This can be done via the GUI with Hyper-V manager or using PowerShell.
How to expand vhdx disk or shrink vhdx disk size ?
Choose the Edit option for the virtual disk file and then you can choose to Expand, Shrink, or Compact.
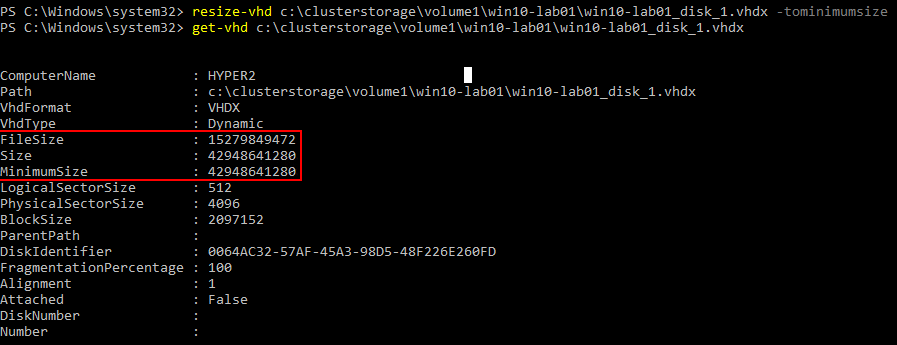
With PowerShell, you run the Resize-vhd cmdlet to resize. You can easily see the information regarding the virtual hard disk with the get-vhd cmdlet.

Below we are using the resize-vhd cmdlet to resize the file to the minimum size. You can see the file size has indeed changed when comparing the above cmdlet return for information compared to the below-returned file size information. The minimum size parameter will Shrink VHDX to the smallest possible size. Again, this can be done while the virtual machine is powered on.
Concluding Thoughts
With the newer version of Microsoft Hyper-V, there are quite a few new capabilities in regards to virtual hard disks that Hyper-V administrators to take advantage of. With VHDX virtual hard disks, there are new capabilities in regards to both optimizing and resizing the virtual hard disk. Dynamic virtual hard disks are the preferred configuration since there is no performance penalty with VHDX, reclaiming free space and blocks is a process that Hyper-V administrators can add to the list of tasks they can perform to optimize their Hyper-V environments and reclaim space.
Additionally, with the new ability to expand or shrink VHDX files on running virtual machines, either growing or shrinking them, administrators have the ability to reclaim space or add space on the fly without a maintenance period. All of these new features and capabilities allow Microsoft Windows Server Hyper-V environments to be even more powerful, scalable, and efficient for running production workloads.
FAQ
1. Can you resize a Hyper-V VHDX while the VM is running?
Expanding may be possible while running, depending on configuration. Shrinking requires the VM to be powered off.
2. How do you shrink a Hyper-V VHDX file?
First, reduce the partition size inside the guest operating system using Disk Management. Then use Hyper-V Manager or PowerShell to shrink the VHDX file safely.
3. What is the difference between expanding and compacting a VHDX?
Expanding a VHDX increases its maximum storage capacity. Compacting reduces the physical file size on disk by reclaiming unused space.
4. Is resizing a VHDX file risky?
Expanding a VHDX is generally low risk. Shrinking carries moderate risk if disk partitions are not properly adjusted. Always take a backup before resizing.
5. What is the maximum size of a VHDX file?
A VHDX file supports virtual disk sizes up to 64 TB, making it suitable for large-scale and enterprise-level workloads.
Begin an Extraordinary Journey: Experience the Ultimate Hyper-V Backup Solution!
Strengthen your critical data with the secure and seamless magic of Hyper-V backup, forming an impregnable fortress of protection. Unlock the full potential of your virtual world, safeguarding your invaluable information with unwavering confidence. This exciting opportunity awaits — step into a realm of endless possibilities and ensure the safety of your data with a free trial today!
Are you ready to embark on this captivating journey? Download BDRShield now and take the first step towards securing your Hyper-V environment. Embrace tranquility and immerse yourself in the realm of unparalleled Hyper-V backup excellence.
Curious to explore further? Discover the secrets of Hyper-V backup with BDRShield and unleash the power of seamless data protection!
Related Posts:
How to convert VHD to VHDX Disks with Hyper-V
Beginners’ Guide for Microsoft Hyper-V: VHD vs VHDX Vs AVHD/AVHDX: Overview of Virtual Disk Formats – Part 22
Convert VHD to VHDX using Hyper-V Manager and Powershell
Beginners’ Guide for Microsoft Hyper-V: Hyper-V AVHDX Files – Part-56
Follow our Twitter and Facebook feeds for new releases, updates, insightful posts and more.
