
TL;DR: Managing certificates in Proxmox VE 8.1 ensures secure access to the web interface and encrypted communication between nodes. Administrators can use self-signed or trusted SSL certificates and automate renewal processes. Proper certificate management is critical for security, compliance, and avoiding browser warnings.
Introduction
Proxmox Virtual Environment (VE) is a robust open-source virtualization platform that enables you to efficiently deploy and manage virtual machines (VMs), containers, and storage. While deploying your infrastructure, security is of utmost importance when operating virtualized environments and certificates play a crucial role in guaranteeing secure communication among different Proxmox VE components.
This blog post will serve as a comprehensive guide to managing certificates in Proxmox VE 8.1. We’ll dive into the different types of certificates used within the platform, including those for intra-cluster communication, the API, and the web GUI. We’ll explore the limitations of the default self-signed certificates and guide you through various methods for deploying trusted certificates, including uploading custom certificates and leveraging Let’s Encrypt (ACME) for automatic certificate issuance and renewal.
By the end of this post, you’ll be equipped with the knowledge and tools to effectively manage certificates in your Proxmox VE 8.1 environment, ensuring secure and reliable communication within your virtualized infrastructure.
To start, let’s talk about the different kinds of certificates that Proxmox VE uses and why it’s important to manage them correctly.
Understanding Certificates in Proxmox VE 8.1
Proxmox VE utilizes certificates for various purposes, ensuring secure communication between different components. However, there are two main categories of certificates to consider:
Default Certificate Management
By default, Proxmox VE creates its own internal Certificate Authority (CA) upon cluster creation. This CA is responsible for issuing self-signed certificates to each node within the cluster. These certificates are used for:
- Intra-Cluster Communication: Secure communication between several Proxmox VE nodes for functionalities like cluster management and virtual machine migration relies on these self-signed certificates
- Shell/Console with SPICE: When accessing the console of a virtual machine using SPICE, these certificates ensure encrypted communication between the Proxmox VE web interface and the guest VM
Limitations of Self-Signed Certificates
While self-signed certificates offer a basic level of security within the cluster, they come with limitations:
- Security Warnings: Since self-signed certificates aren’t issued by a trusted Certificate Authority (CA), web browsers will display security warnings when accessing the Proxmox VE web interface. This can be inconvenient and raise concerns for users unfamiliar with the concept
- Limited External Communication: External systems do not recognize these certificates, potentially hindering functionalities that rely on secure communication with external services
Viewing Default Certificates (Optional)
Although directly modifying the default certificates isn’t recommended, you can view information about them using the following command in the Proxmox VE shell:
/etc/pve/pve-ssl/*.pem
This command will display the certificate’s contents and key files in the
/etc/pve/pve-ssl directory.
In the next section, we’ll explore alternative methods for managing certificates in Proxmox VE, allowing you to overcome the limitations of self-signed certificates and establish trusted communication within your virtualized environment.
Managing Different Types of Certificates
Proxmox VE offers flexibility when it comes to managing certificates. Let’s explore two main approaches:
Uploading Custom Certificates
This method allows you to leverage certificates signed by a trusted CA for enhanced security and user trust. Here’s what you’ll need:
- Key and Certificate Files: You’ll require a pair of PEM-formatted files containing your server key and the corresponding certificate issued by a trusted CA
- Intermediate Certificates (Optional): If your certificate chain involves intermediate certificates, ensure you have all the necessary PEM files
You can easily upload a certificate for a Proxmox VE node through the web interface if you already have one. Keep in mind that the certificate key file, if one is given, can’t be locked with a password.
Using Let’s Encrypt (ACME) for Trusted Certificates
Simplify your certificate management with Let’s Encrypt, a free, automated, and trusted Certificate Authority. Proxmox VE integrates with Let’s Encrypt through the ACME (Automatic Certificate Management Environment) protocol. Here’s what you can achieve:
- Automatic Issuance: Leverage the Let’s Encrypt service to automatically obtain trusted certificates for your Proxmox VE web interface
- Renewal Automation: Configure automatic renewal to ensure your certificates remain valid, eliminating the need for manual intervention
Remember, uploading custom certificates provides complete control over the certificate source, while Let’s Encrypt offers a convenient and automated approach for obtaining trusted certificates. Select the method that best meets your security needs and administrative preferences.
Enabling Trusted Certificates with Let’s Encrypt (ACME)
As discussed, Let’s Encrypt offers a compelling solution for managing certificates in Proxmox VE. Let’s explore the configuration steps involved:
Prerequisites
- Domain Name: You’ll need a registered domain name that resolves to the public IP address of your Proxmox VE server. Let’s Encrypt validates domain ownership during certificate issuance
- Port 80 Access: The Let’s Encrypt validation process typically involves an HTTP challenge on port 80. Ensure port 80 is accessible from the internet (consider firewall rules) or explore alternative challenge types if necessary (explained later)
Enabling Let’s Encrypt with Proxmox VE
Now that we have our Cloudflare API key and DNS redirections set up, let’s configure Proxmox to use SSL certificates. Follow these steps:
1. Log in to your Proxmox server.
2. Click on “Data Center” and scroll down to “ACME”.
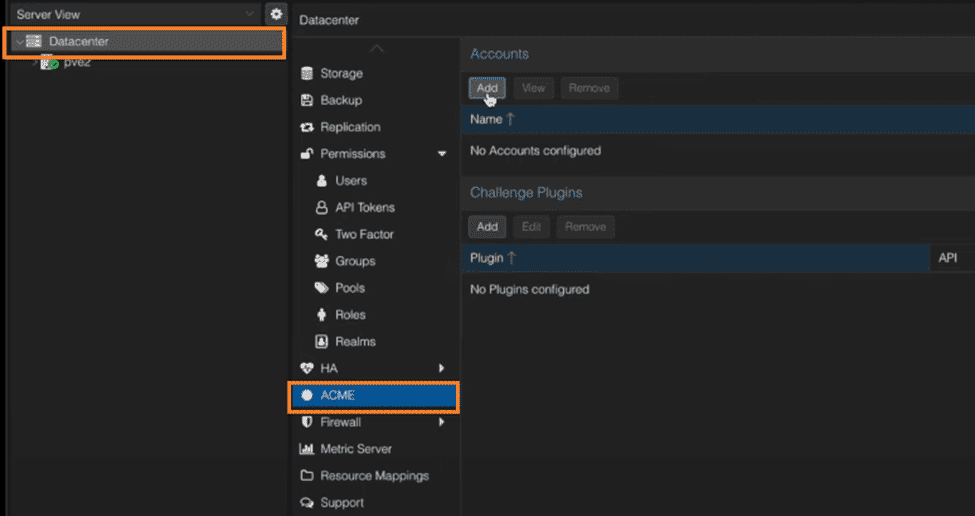
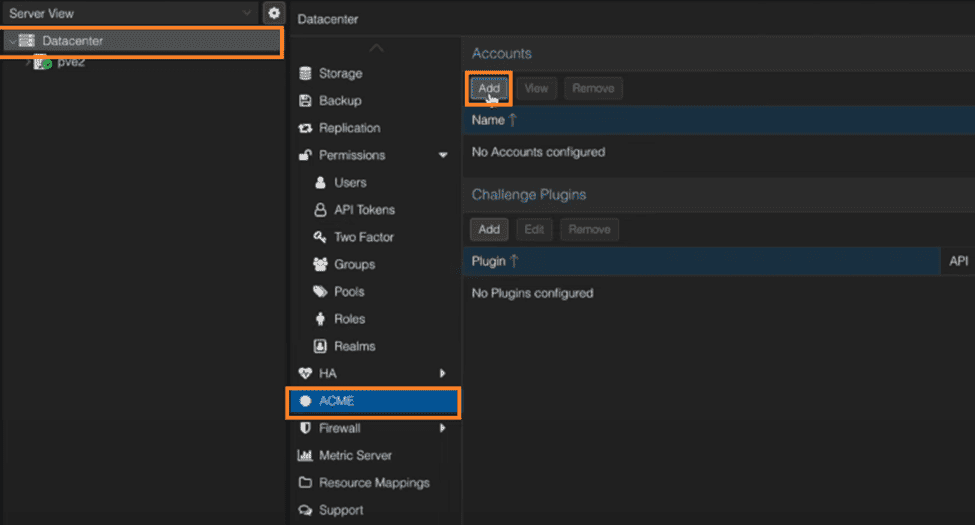
3. Click on “Add” under “Accounts” to create a production account. You can also create a staging account.
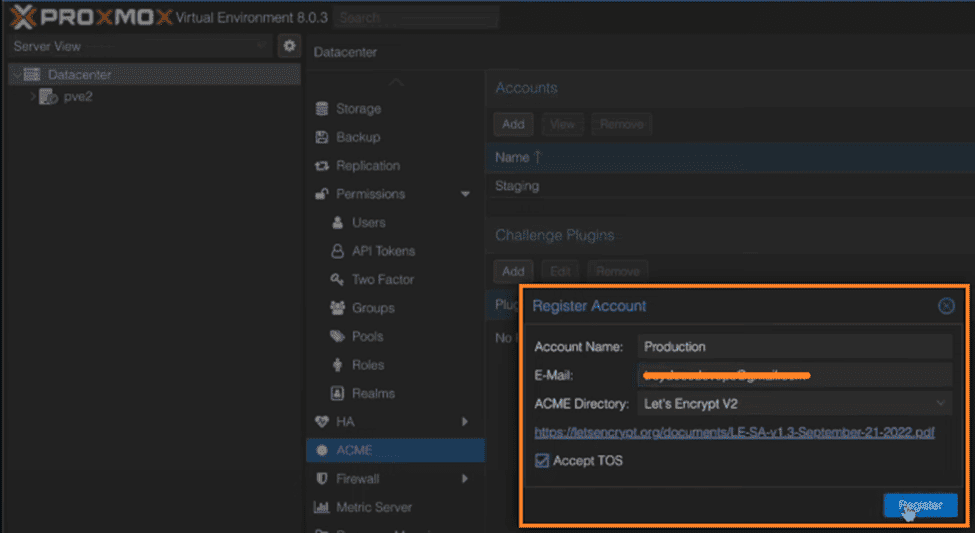
4. Enter your email and select “production” as the account type. Accept the Terms of Service (TOS), and click “Register”.
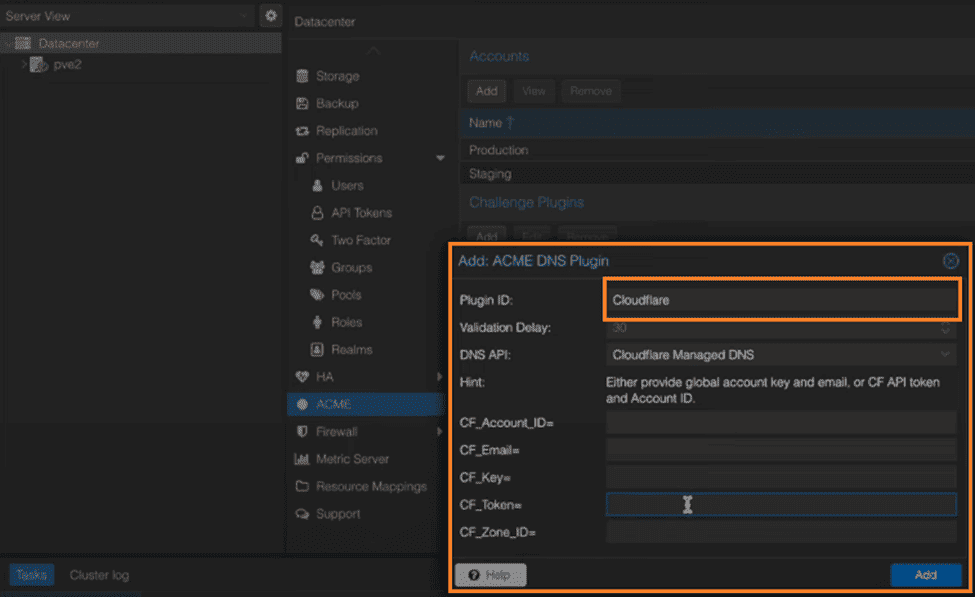
5. Choose your DNS plugin (in this case, Cloudflare). Enter your Cloudflare account ID and API key. And, click “Add” to add the DNS plugin.
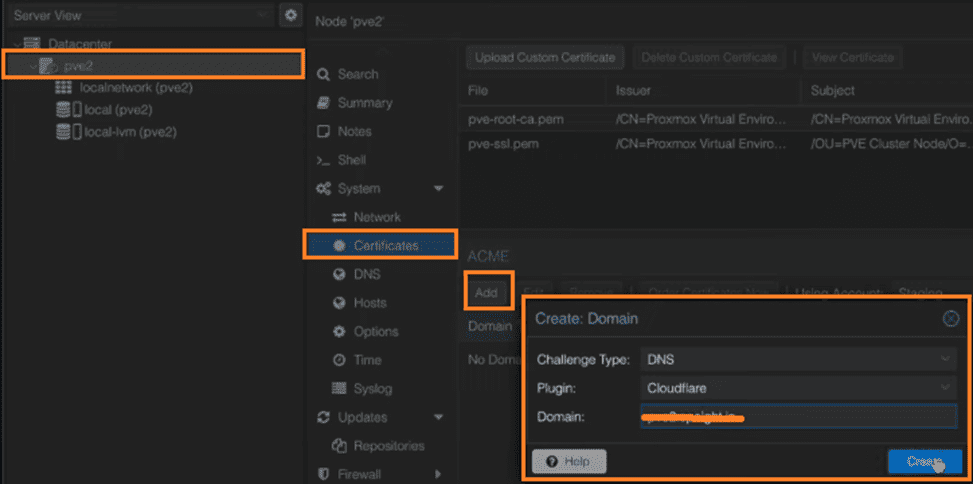
6. Select your Proxmox server and go to “Certificates”. Click “Add” and change the challenge type to DNS. Choose the DNS plugin you created earlier (Cloudflare). Enter the fully qualified domain name of your server. And, click “Create”.
7. Wait for the validation process to complete.
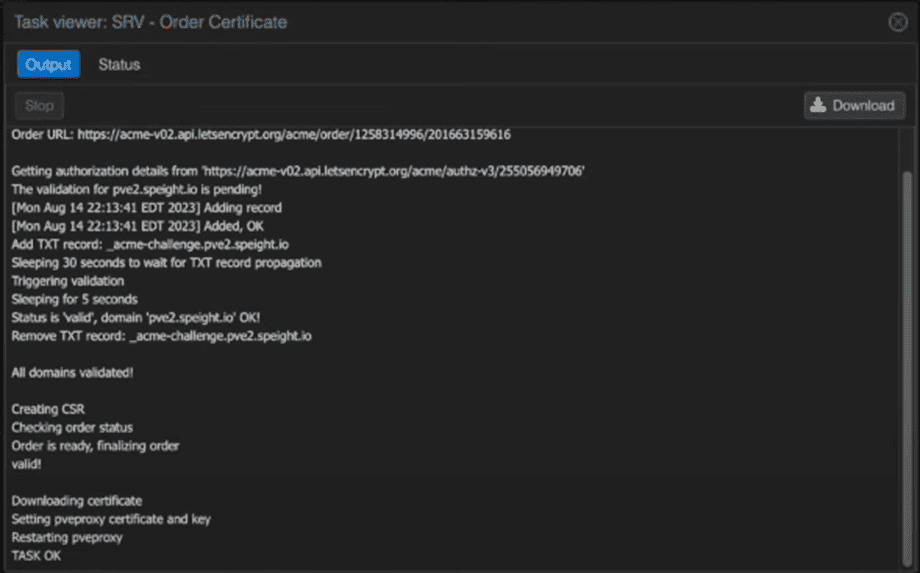
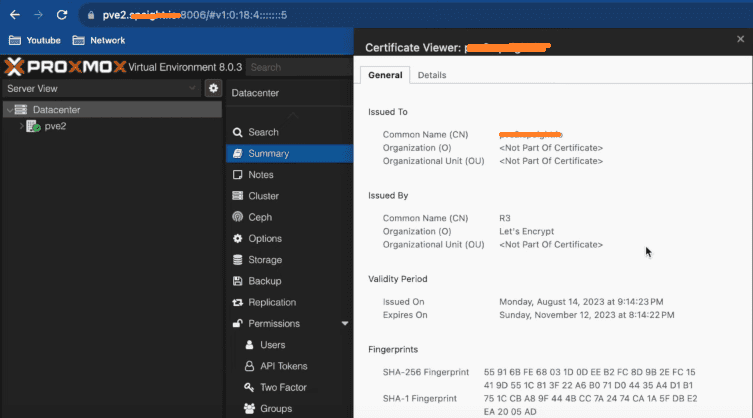
8. Once the browser refreshes, you should see a valid SSL certificate.
Automatic Renewal
Let’s Encrypt certificates have a limited validity period (typically 90 days). To ensure uninterrupted secure communication, you can configure automatic renewal:
Proxmox VE will now automatically renew your Let’s Encrypt certificates before they expire, maintaining a secure and trusted environment.
FAQs
1. How do you manage certificates in Proxmox VE 8.1?
Certificates in Proxmox VE 8.1 can be managed via the web interface or command line. Administrators can upload custom SSL certificates or use Let’s Encrypt for automated certificate issuance and renewal.
2. Can you use Let’s Encrypt certificates in Proxmox?
Yes, Proxmox VE supports Let’s Encrypt integration for free SSL certificates. This allows automatic certificate issuance and renewal, improving security and eliminating browser warnings.
3. Where are certificates stored in Proxmox VE?
Certificates are typically stored in the /etc/pve/local/ directory. This location contains SSL certificate and key files used by the Proxmox web interface and services.
4. Why is certificate management important in Proxmox?
Proper certificate management ensures encrypted communication, protects against man-in-the-middle attacks, and maintains compliance with security standards. It also prevents browser trust warnings.
5. How do you renew an SSL certificate in Proxmox?
Certificates can be renewed manually by replacing certificate files or automatically when using Let’s Encrypt. After renewal, services must be restarted or reloaded to apply the updated certificate.
Conclusion
Throughout this blog post, we’ve explored various methods for managing certificates in Proxmox VE 8.1. We began by understanding the limitations of self-signed certificates and the importance of establishing trust. We then delved into alternative approaches, including uploading custom certificates for granular control and leveraging Let’s Encrypt (ACME) for a convenient automated solution with automatic renewal.
By implementing the methods discussed here, you can significantly enhance the security of your Proxmox VE environment. Let’s Encrypt integration offers a compelling solution for most users, ensuring trusted communication for the web interface and eliminating the need to manually manage certificate lifecycles.
This guide serves as a starting point for managing certificates in Proxmox VE 8.1. For further information, refer to the Proxmox VE documentation. Don’t hesitate to experiment and explore advanced functionalities like those offered by the pvenode tool to tailor your certificate management strategy to your specific needs.
We encourage you to share your experiences and ask questions in the comments section. Happy virtualizing with Proxmox VE!
Follow our Twitter and Facebook feeds for new releases, updates, insightful posts and more.
